1. Instalación inicial
Seguimos a https://www.linuxtechi.com/how-to-install-gitlab-on-debian/?utm_content=cmp-true
# 1) Update the System
$ sudo apt update
# 1) Install GitLab dependencies$ sudo apt install wget ca-certificates curl apt-transport-https gnupg2 -y

#3) Install Gitlab on Debian 12
$ curl -s https://packages.gitlab.com/install/repositories/gitlab/gitlab-ce/script.deb.sh | sudo bash
$ sudo apt install gitlab-ce -y
Comprobar que funciona y apuntarse la contraseña de "root". Para ello entrar en
http://192.168.xxx.xxx
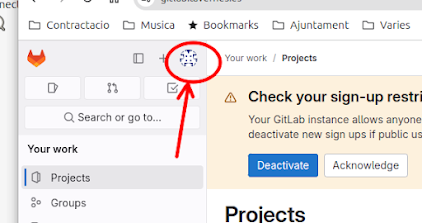
y dar la contraseña de root y un correo para ello marcar el símbolo mostrado:
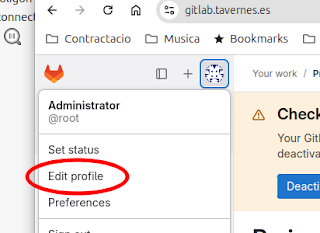
Seleccionar Edit profile:

Y ahí comprobamos el email y la contraseña.
2. Obtener un certificado SSL.
Parece ser que gitlab quiere una clave (.key) y un certificado (.crt) cuyo nombre sea el mismo que el dominio de la máquina, por ejemplo "gitlab.municipio.es"
2.1 Opción 1: Partimos de un certificado con extension p12
Para ello, si partimos de un certificado "wildcard" en formato p12 seguiremos las instrucciones de https://www.ssl.com/how-to/export-certificates-private-key-from-pkcs12-file-with-openssl/
Veamos como obtenemos la clave privada (.key) y el certificado (.crt) cuyo nombre sea del dominio
# 1) Get only private key with domain name
$ openssl pkcs12 -in crt_wildcard.p12 -out gitlab.municipio.es.key -nodes -nocerts
# 1) Get only certificate with domain name
$ openssl pkcs12 -in crt_wildcard.p12 -out gitlab.municipio.es.crt -nokeys
2.2 Crear la entidad certificadora CA los certificados:
#1. Generar clave privada encriptada para la CA
#   Nos pide una contraseña que hay que guardar
openssl genrsa -aes256 -out MyRootCA.key 4096

#2. Generar certificado autofirmado para la CA par 5 años 1825 dias
openssl req -x509 -new -nodes -key MyRootCA.key -sha256 -days 1825 -out MyRootCA.crt

#3. Agregar el certificado de la CA a los certificados raíz de confianza de los usuarios y del servidor gitlab !!!!
#   En sistemas Linux:
sudo cp MyRootCA.crt /usr/local/share/ca-certificates/
sudo update-ca-certificates

#   En Windows, instálelo manualmente en Certificados - Usuario actual > Entidades de certificación raíz de confianza.

#4. Generar clave privada para el servidor Gitlab con dominio gitlab.municipio.es
openssl genrsa -out gitlab.municipio.es.key 2048

#5. Crear un archivo de configuración "gitlab_openssl.cnf" para incluir SAN
#  Copiar este texto al archivo "gitlab_openssl.cnf"
[ req ]
default_bits       = 2048
prompt             = no
default_md         = sha256
distinguished_name = req_distinguished_name
req_extensions     = req_ext

[ req_distinguished_name ]
C  = ES
ST = Valencia
L  = municipio
O  = MiEmpresa
CN = gitlab.municipio.es

[ req_ext ]
subjectAltName = @alt_names

[ alt_names ]
DNS.1 = gitlab.municipio.es


#6. Generar la CSR con CN y SAN
openssl req -new -key gitlab.municipio.es.key -out gitlab.municipio.es.csr -config gitlab_openssl.cnf

#6. Firmar el CSR con tu CA
openssl x509 -req -in gitlab.municipio.es.csr \
-CA MyRootCA.crt -CAkey MyRootCA.key -CAcreateserial \
-out gitlab.municipio.es.crt -days 365 -sha256 \
-extfile gitlab_openssl.cnf -extensions req_ext

#7. Verificar que  el CN y SAN están incluidos en el certificado
openssl x509 -in gitlab.municipio.es.crt -text -noout

#   Deben aparecer estos datos
#   CN = gitlab.municipio.es
#   X509v3 extensions:
#      X509v3 Subject Alternative Name:
 DNS:gitlab.tavernes.es

#7. Copiar a la carpeta del servidor /etc/gitlab/ssl/ estos archivos:
gitlab.municipio.es.crt
gitlab.municipio.es.key
MyRootCA.crt

#8. Configurar en GitLab (/etc/gitlab/gitlab.rb):
nginx['ssl_certificate'] = "/etc/gitlab/ssl/gitlab.munipio.es.crt"
nginx['ssl_certificate_key'] = "/etc/gitlab/ssl/gitlab.municipio.es.key"

#9. Reiniciar gitlab
sudo gitlab-ctl reconfigure
sudo gitlab-ctl restart

#10. Agregar el certificado MyRootCA.crt a los certificados de CA de chrome (Configuración, provacidad y seguridd, certificados ..)

#11. Borrar caché de Chrome
#    Haz clic en los tres puntos verticales (el menú "Más") en la esquina superior derecha del navegador.
#    Luego "Borrar datos de navegación".
2.2 Opción 2: Nos creamos un certificado self-signed (autofirmado) NO VA!!
Para ello, si partimos de un certificado "wildcard" en formato p12 seguiremos las instrucciones de https://medium.com/@gengchao77977/configure-self-signed-ssl-certificate-on-gitlab-58cc8e8cf3fa
# 1) Create the root CA key $ sudo openssl genrsa -out ca.key 4096# 2) Create the root CA certificate$ sudo openssl req -x509 -new -nodes -key ca.key -sha256 -days 365 -out ca.crt -subj '/CN=gitlab.municipio.es' #3) Create a certificate signing request (CSR) $ sudo openssl req -new -nodes -out gitlab.municipio.es.csr -newkey rsa:4096 -keyout gitlab.municipio.es.key -subj '/CN=gitlab.municipio.es'
#4) Create a certificate configuration file. Create a file named "run.extfile" with this content basicConstraints=critical,CA:TRUE keyUsage = digitalSignature, nonRepudiation, keyEncipherment, dataEncipherment subjectAltName = @alt_names [alt_names] DNS.1 = yourdomain.com #5) Create a Gitlab certificate $ sudo openssl x509 -req -in gitlab.municipio.es.csr -CA ca.crt -CAkey ca.key -CAcreateserial -out gitlab.municipio.es.crt -days 365 -sha256 -extfile run.extfile
3. Instalar el certificado en gitlab.
Modificamos el fichero /etc/gitlab/gitlab.rb y añadimos estas líneas
#----------------------------------------#6.1 Edit the /etc/gitlab/gitlab.rb as follows #---------------------------------------- # your GitLab instance URL external_url "https://yourdomain.com" # auto http -> https nginx['redirect_http_to_https'] = true # please note to disable letsencrypt letsencrypt['enable'] = false #----------------------------------------
Crear un directorio por ejemplo ssl cuya ruta absoluta será /etc/gitlab/ssl y copiamos la clave privada (gitlab.municipio.es.key) y el certificado (gitlab.municipio.es.crt) dentro de esta carpeta.
Cambiamos los permisos de la carpeta y reconfiguramos gitlab. A veces puede requerirse que se vuelva a rearrancar el servicio e incluso a puede ser necesario hcer un "reboot" del servidor
Opcionalmente podemos ver que nos dice del certificado
#6.2 Create the folder in etc/gitlab and copy the certificate$ sudo mkdir -p /etc/gitlab/ssl $ sudo chmod 755 /etc/gitlab/ssl
$ sudo cp -f cert_file /etc/gitlab/ssl/$ sudo gitlab-ctl reconfigure#6.2.1 Optional: Sometimes it is requiered to restart the gitlab service#6.3 Verify the added certificate $ sudo openssl s_client -showcerts -verify 3 -connect yourdomain.com:443$ sudo gitlab-ctl restart#6.2.2 Optional: Sometimes it is requiered to resboot the server$ sudo reboot
4. Comprobar que funciona
Con el navegador apuntamos a https://gitlab.municipio.es
5. Crear un nuevo proyecto y repositorio
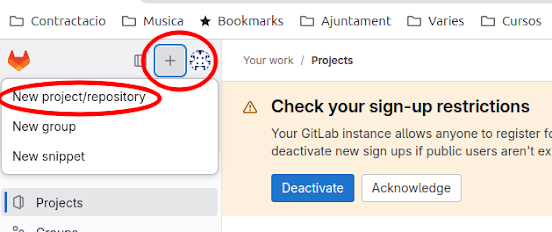
Hacer click en el simbolo "+" de la parte superior izquierda y continuación seleccionmos "New project/repository"
Le damos a"Create blank project"
Damos nombre, namespace/group (root) y "project slug" opcional, y le damos los permisos "Private" y creamos el proyecto
Y nos sale
NO USAR ESTO QUE VIENE A CONTINUACIÓN!!!
6. Guardar (Push) una carpeta existente en el repositorio
Como se muestra en la imagen anterior, nos mentemos en la carpeta a guardar y ejecutamoscd my-python-librarygit config --global user.name "Administrator"
git config --global user.email "axxxxxxxx.org" init --initial-branch=main
git remote add origin git@gitlab.xxxx-xx:root/my-python-library.git
git add .
git commit -m "Initial commit"
git push --set-upstream origin main
Ahora ya hemos guardado nuestro proyecto en el gitlab


No hay comentarios :
Publicar un comentario